Creating a stunning embroidered design can feel daunting at first, but this guide makes it approachable. Designed for embroidery for beginners, it walks you through practical steps, friendly explanations, and visuals you can imagine as you stitch. Start with the right tools and simple beginner embroidery stitches to build confidence, then expand with how to embroider designs and embroidery design ideas. With steady practice and mindful color choices, you’ll be amazed at what a well-planned project can become. By the end, you’ll see a finished piece you’d wear, gift, or display, all rooted in hand embroidery techniques that feel accessible.
In other words, this approachable needlework journey invites you to explore thread art, stitch work, and fabric embellishment. Viewed as a beginner’s textile craft, it rewards patience, steady practice, and the same mindset behind hand embroidery techniques you’ll use later. As you grow more confident, you’ll apply the fundamentals to broader projects—pattern planning, color play, and decorative motifs—without losing the handmade charm.
Getting Started: Essential Tools and Setup for Beginners
Getting started the right way matters for embroidery for beginners. A simple embroidery hoop, sharp scissors, and a small palette of floss provide a solid foundation, helping you stay focused on the stitch rather than the gear. You don’t need premium fabrics or fancy machines to begin; plain cotton or linen and a handful of colors are plenty to start building confidence.
Set up a calm, well-lit workspace and practice keeping the fabric taut in the hoop. By practicing a few core beginner embroidery stitches, you’ll build muscle memory and a steady rhythm, which is the heart of embroidery for beginners. With consistent practice, you’ll notice cleaner lines and more even spacing.
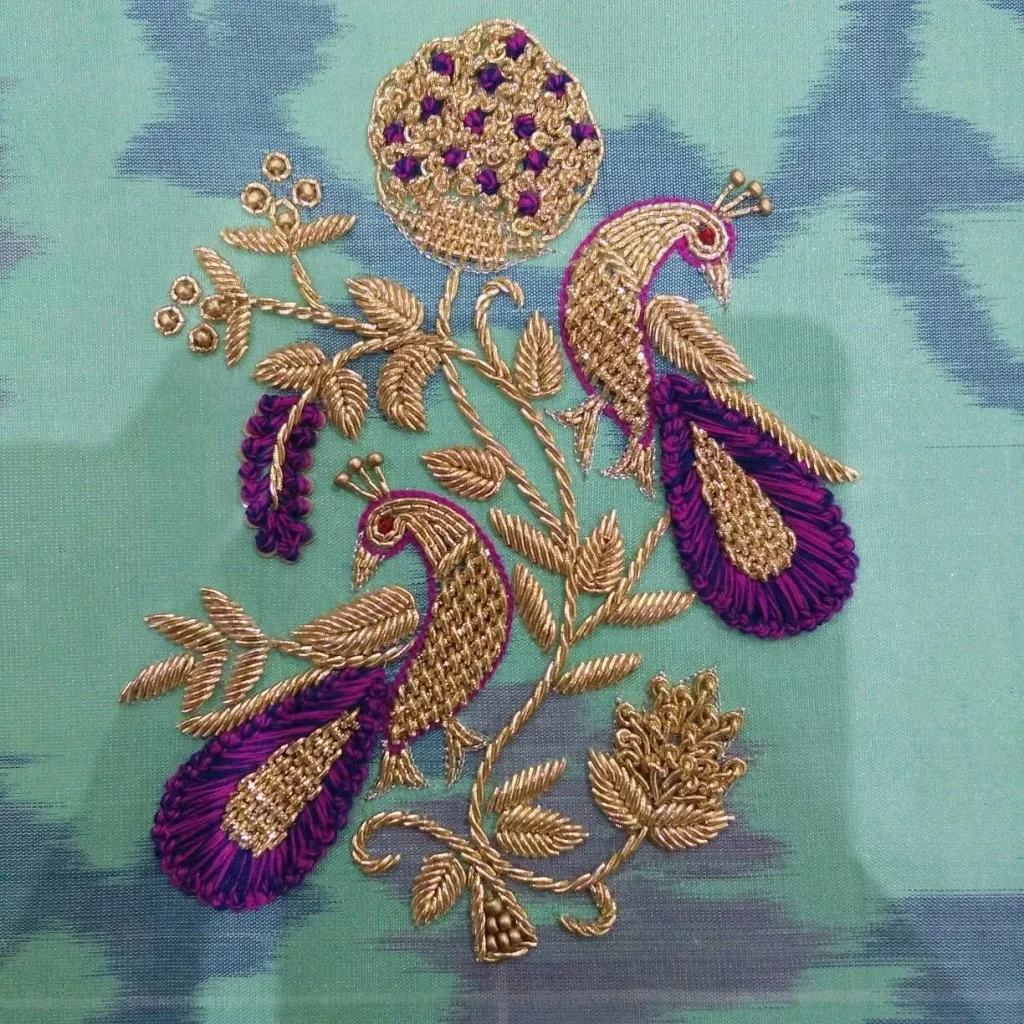
Planning a Stunning Motif: How to Craft a Stunning Embroidered Design
A well-planned motif is the foundation of a stunning embroidered design. Start with something small and repeatable, like a single flower or geometric leaf, so you can practice control without feeling overwhelmed. When exploring embroidery design ideas, keep contrast high and the motif simple enough for your current skill, then build from there with how to embroider designs in mind.
Choose a color palette that uses two or three hues that play well together, then map out where fills and outlines will go. This planning step is a practical exercise in embroidery for beginners and can be done with simple hand embroidery techniques, focusing on clean edges and balanced density.
Mastering Basic Stitches: A Roadmap to Beginner Embroidery Stitches
Start with the backbone stitches that every project needs: backstitch, running stitch, and stem stitch. These beginner embroidery stitches form the foundation of most patterns and teach you how threads behave on fabric. Practice keeping stitches uniform and relaxed to develop consistent results.
Once you’re comfortable, introduce satin stitch for solid color areas and long-and-short stitches for shading and texture. These techniques are classic hand embroidery techniques that elevate simple motifs and help you progress from beginner to more confident work, all while reinforcing the core stitch fundamentals.
Transferring and Preparing Designs: How to Embroider Designs with Confidence
Transferring your motif onto fabric is a key early step. Whether you use a water-soluble pen, carbon transfer paper, or a light pencil, the goal is a clear guide that you can follow while stitching. This transfer phase is a common stumbling block for embroidery for beginners, so take your time to get lines light and removable.
Secure the fabric in your hoop, choose a comfortable grip, and consider a light stabilizer if your fabric tends to pucker. Proper preparation supports how to embroider designs and helps you maintain even tension, which is essential for clean results.
Color Play and Texture: Techniques for Embroidery Design Ideas
Color selection matters as much as stitch choice. Plan with value and contrast in mind, and use satin and long-and-short stitches to build texture that reads well from a distance. Exploring embroidery design ideas through color helps you communicate mood and depth, especially when you’re practicing hand embroidery techniques.
Try French knots for dimension, lazy daisies for petals, and subtle shading with layered stitches. This approach blends color, line, and texture into cohesive designs, and it’s a productive path for any learner exploring how to embroider designs.
Finishing, Care, and Display: Turning Practice into Personal Artwork
Finishing touches matter just as much as the stitching itself. Trim threads neatly, weave ends to minimize knots, and consider a light wash or blocking to set stitches. Proper finishing is a frequent topic in embroidery for beginners and helps you preserve the look of your stunning work.
Frame, hoop, or sew the piece onto a garment or accessory, then store it in a cool, dry place away from direct sunlight. Regular care—gentle washing, proper storage, and thoughtful display—keeps your projects looking fresh and shows how your practice has become personal artwork.
Frequently Asked Questions
What defines a stunning embroidered design for beginners and how do you start?
A stunning embroidered design for beginners combines clean outlines, balanced color, and even stitches. To start, set up a taut fabric in a hoop, choose a simple motif, and practice essential beginner embroidery stitches. This approach helps you learn how to embroider designs and build a solid foundation for future projects.
Which beginner embroidery stitches are essential for a stunning embroidered design?
For a stunning embroidered design, focus on a few core stitches: backstitch for precise outlines, running stitch for light lines, stem stitch for curved lines, satin stitch for solid color, and accents with French knots or lazy daisies. Practice these beginner embroidery stitches evenly to build texture and control.
How do you transfer and plan a pattern to achieve a stunning embroidered design?
Start with a simple motif and plan color contrast and stitch density. Transfer the design onto fabric with a water-soluble pen or light pencil, then secure the fabric in a hoop. This approach reflects how to embroider designs to create a stunning embroidered design: clear lines, a manageable size, and thoughtful color choices.
What embroidery design ideas work well for beginners aiming for a stunning embroidered design?
Great starter ideas include floral motifs, geometric shapes, short lettering, and small animal silhouettes. These embroidery design ideas translate well to a stunning embroidered design when kept simple, with careful color selection and balanced stitching.
What hand embroidery techniques help elevate a stunning embroidered design?
Key hand embroidery techniques include satin stitch for solid color, long-and-short for shading, French knots for centers, and lazy daisies for petals. These hand embroidery techniques add depth and interest to a stunning embroidered design while remaining approachable for beginners.
How should you finish and care for your stunning embroidered design to keep it looking fresh?
Finish with neat back-stitch or knots, trim threads, and secure ends. If washable, launder gently and block the piece to keep stitches flat. Frame or mount your finished work to display, and store it away from direct sunlight to preserve colors, helping your stunning embroidered design stay vibrant. These finishing tips are especially helpful for embroidery for beginners who want their first projects to last.
| Topic | Summary | Practical Tips |
|---|---|---|
| Materials & Setup | Gather essential tools and fabrics, keep setup comfortable and fabric taut to support even stitches. | Hoop or frame, cotton/linen fabric, optional stabilizer, size 7–9 needles, embroidery floss in a few colors, small scissors, transfer method, simple pattern, optional thimble and ruler. Center fabric in hoop, pull taut gently, choose a calm workspace. |
| Design Planning | Choose beginner-friendly motifs with balance of color and negative space; start simple and build complexity gradually. | Consider color contrast, stitch density, edge work; begin with two to three colors; plan layout before stitching. |
| Getting Started (Steps) | Follow a beginner-friendly path from design transfer to finishing touches, using core stitches for outlines and fills. | 1) Transfer motif; 2) Thread with two strands; 3) Secure fabric; 4) Outline with backstitch; 5) Fill with satin or long-and-short stitches; 6) Add details (French knots, lazy daisies); 7) Finish edges; 8) Remove transfer lines. |
| Stitch Techniques | Build a foundation with a set of reliable hand stitches for outlines, fills, and texture. | Backstitch, Running stitch, Stem stitch, Satin stitch, French knot, Lazy daisy. Maintain even tension and consistent stitch length. |
| Design Ideas | Try beginner-friendly motifs like florals, geometric shapes, lettering, and small animal silhouettes. | Adjust stitch density and color for readability; start small and expand with practice. |
| Care, Finishing, Presenting | Preserve the piece with proper finishing: trimming, washing/blocking, mounting, and storage. | Trim threads neatly, secure knots, wash if washable, block flat, frame or sew onto item, store away from sunlight. |
| Common Mistakes | Avoid tension issues, uneven stitches, mismatched needle/thread, and skipping secure finishes. | Check hoop tension, re-thread if needed, select appropriate needle for fabric, finish knots securely. |
| Practice & Inspiration | Set small weekly projects to build skill and personal style while keeping practice enjoyable. | Experiment with motifs and color palettes; gradually introduce shading and texture for depth. |
Summary
A stunning embroidered design table summarizes practical steps for beginners, covering materials, planning, step-by-step how-tos, stitches, design ideas, care, common mistakes, and ongoing practice to help you start confidently and progressively improve.