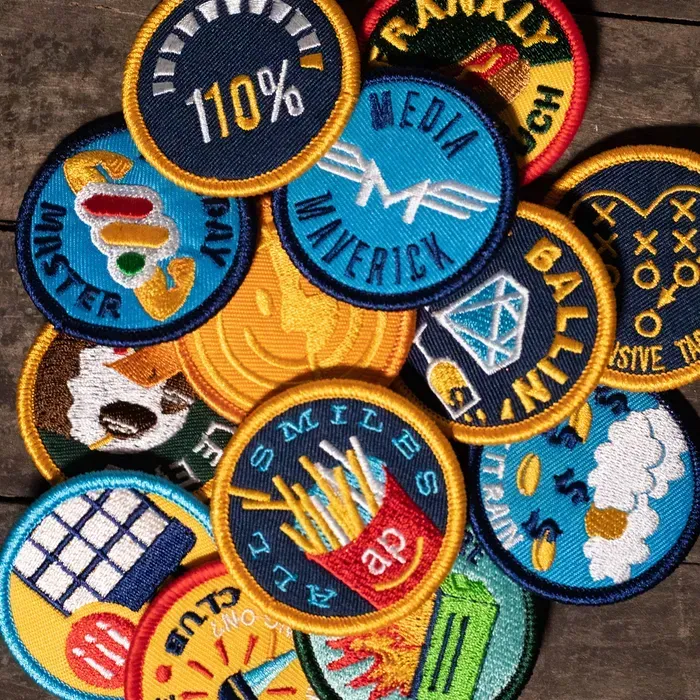
Custom patches have emerged as a powerful, affordable way to showcase identity, values, and creativity across clothing, bags, hats, and gear, helping brands, clubs, and individuals tell a story with texture, color, and personality. Mastering designing patches—from the initial concept and vector art to stitch plans and finishing touches—puts you in control of how your brand is perceived at the smallest scale while ensuring the message remains clear under close scrutiny. This guide walks you through choosing the right production approach, selecting backing options, and crafting ideas for customization that balance durability, budget, and visual impact for everyday wear or limited runs. Whether you’re launching a product line, outfitting a team, or decorating gear for events, embroidered patches offer a tangible, eye-catching badge of identity that travels with your audience across seasons. Even better, practical care for patches guidelines ensure your designs stay vibrant through wash cycles, sun exposure, and wear, extending the life of your branding.
Viewed through an alternative lens, this topic becomes about creating badge-like identifiers for apparel, bags, and gear—emblems that convey affiliation, quality, and personality at a glance. From rough sketches to digitized art and production-ready files, the workflow parallels other textile embellishments, emphasizing consistent color, scalable graphics, and reliable backing. Options range from traditional embroidery and woven patches to heat-cut patches or dye-sublimated finishes, each with distinct costs, durability, and storytelling potential. Framing the process with clear briefs, proofs, and quality checks ensures the end result aligns with audience expectations and your brand standards.
Designing Patches: From Concept to Vector Art
Designing patches starts with a clear goal: define the patch’s purpose, audience, and message. In the process of designing patches, you shape brand perception through color theory, stitch types, and the overall silhouette of the patch. This foundational step influences how the final embroidered patches will look when worn on clothing, bags, or gear, and it reduces revisions during patch production.
Prepare vector art (AI, EPS, or SVG) so printers or embroidery machines can scale without losing quality. As you refine your design, consider color separations, Pantone references, and which embroidery style (satin for outlines, fill stitches for shapes) best realizes your concept. In this phase, you’ll also decide on backing options and how the patch will be worn, which impacts both designing patches and later production decisions.
Patch Production Options: Embroidered, Felt, and Sublimated Patches
Patch production offers multiple methods to match your budget and design complexity. For embroidered patches, traditional embroidery with dense satin stitches delivers a premium look, while felt or woven patches offer texture and detail that suit certain aesthetics. Dye-sublimation patches excel at full-color art, but require sealing to ensure durability. Understanding these patch production options helps you pick the right method for your design and use case.
Backing and finishing choices influence durability and wear: iron-on, sew-on, or hook-and-loop backs, as well as edge finishing options like Merrow or heat-cut. During patch production, quality control matters: check stitch density, color consistency across lots, and edge stability. Request a test patch or short run to confirm that your patch production meets expectations before committing to a full order.
Care for Patches: Maintenance Tips to Extend Longevity
Care for patches is essential to maintain their appearance after purchase or use. Proper care instructions improve the longevity of embroidered patches and help protect your branding. In your care for patches guidelines, cover washing, drying, ironing, and storage to minimize fuzz, fraying, and color migration.
Store patches flat or folded to prevent distortion and remind customers to dry garments before packing. Demonstrate care in product photography or catalogs by showing patches in their natural context, on jackets, caps, or bags. Clear care guidelines also reduce returns and reinforce the lasting value of your patch line.
Custom Patches for Branding: Identity, Community, and Collaboration
Custom patches unlock opportunities for branding, clubs, events, and fan communities. When you present custom patches, you articulate identity and culture, and you can drive engagement by expanding the audience through partnerships and limited runs. If you’re a business or designer, a patch line that includes custom patches becomes a tangible symbol of community and achievement.
Patch customization ideas such as seasonal colorways, embellishments like enamel gloss or metallic thread, or co-branded collaborations can create demand while controlling costs. Consider bundles that pair patches with pins or stickers, or offer employee patches for recognition programs. Tracking sales and feedback on patch customization ideas helps refine designs and production for future batches.
From Design to Production: Preparing Files for Patch Production
From design to production, file preparation is critical to smooth patch production. Prepare clean vector art, include color references (Pantone or thread color), and deliver color-separated files with labeled layers. A precise stitch plan outlines where fill stitches, satin borders, and running stitches appear, reducing surprises in patch production.
Communicate clearly with your production partner and request digital proofs and physical samples to verify color and placement before large runs. Choosing the right file formats (DST, PES, EXP, etc.) and backing details early minimizes reprints and delays in patch production. This alignment between designing patches and production steps saves time and money and sets the stage for a successful launch.
Quality, Cost, and Efficiency in Patch Production
Quality control, cost, and timing all influence the success of patch production. Establish clear standards for stitch density, color consistency, and edge finish, and test through a small batch before scaling. Regular checks during patch production prevent costly reprints and ensure durable embroidered patches.
Once patches ship, gather data on sales, reorders, and customer feedback on size, color accuracy, and wear performance. Use this data to refine both design and production processes and to drive improvements in patch customization ideas for future lines. Thoughtful care for patches and robust backing choices keep your brand looking sharp across seasons and collections.
Frequently Asked Questions
What are the essential steps in designing patches for embroidered patches?
Start with purpose and audience, choose the patch shape and size, select a purposeful color palette, prepare clean vector art, and decide on embroidery style and backing. Following these steps during designing patches helps ensure legibility, durability, and brand impact in embroidered patches.
How should you prepare files for patch production to ensure accurate color and size?
Provide color references (Pantone or thread colors), create a detailed stitch plan, specify backing and finishing, choose thread types, confirm embroidery formats (DST, PES, EXP), and request both a digital proof and a physical sample. This preparation minimizes color shifts and size errors in patch production.
What patch production method is best for embroidered patches, and what should you consider when choosing among embroidery, felt, woven, or dye-sublimation options?
For embroidered patches, traditional embroidery is the most common method due to durability and a premium look. Consider budget, lead time, and patch size: felt or woven patches offer texture and detail but can be pricier, while dye-sublimation patches reproduce complex images but may require sealing for longevity. Review backing options to match your use case.
How should care for patches be communicated to customers to extend life?
Include clear care for patches with every order: washing guidelines (gentle cycle, mild detergent, inside-out), air-drying preferred, low-heat ironing or pressing with a cloth, and proper storage. Providing care instructions helps patches maintain color and durability over time.
What are effective patch customization ideas to boost branding and sales?
Seasonal colorways to create urgency; tiered offerings with optional embellishments (gloss enamel, metallic thread); bundles with pins or stickers to boost value; employee or member patches to drive loyalty; collaborations with artists or brands to expand reach. Track sales, reorder rates, and customer feedback to refine future patch customization ideas.
How does designing patches for small sizes impact the look of embroidered patches, and what design tips help maintain legibility?
Designing patches for small sizes (1–2 inches) requires simple shapes, bold outlines, high-contrast colors, and minimized fine detail. Deliver vector art, ensure legible color separations, and test proofs or samples to verify placement and density. These steps preserve clarity in embroidered patches for wearables.
| Aspect | Key Points |
|---|---|
| What are custom patches? | Affordable, durable adornments that express identity and values across clothing, bags, hats, and gear. Useful for brands, designers, and hobbyists; design through care to elevate branding and personal projects. |
| Design considerations | Define purpose and audience; choose shape/size (1–2 inches typical) with legibility; color strategy; prepare vector art; choose embroidery style and backing; plan naming/metadata for cataloging. |
| Vector art and file prep | Deliver vector files (AI, EPS, SVG); provide clean outlines and color separations; include Pantone colors or thread references; provide digital proof and color separations; ensure compatibility with printer/embroidery. |
| Embroidery styles & backing | Traditional satin stitches for outlines; fill stitches for shapes; border options (Merrow, heat-cut, needle-edge); backing options (iron-on, sew-on, Velcro); durability considerations. |
| Production methods | Traditional embroidery; felt or woven patches; dye-sublimation/printed patches; backing/adhesion options; test patches for wash durability and colorfastness. |
| Quality control | Check stitch density, color consistency, edge finish, backing stability; request digital proofs and physical samples; test wear and washing; ensure color/placement accuracy. |
| Care & maintenance | Washing/drying guidelines; ironing precautions; storage tips; handling notes; guidance for catalog/display photography to showcase texture and finish. |
| Branding ideas & tracking | Seasonal colorways; tiered offerings; bundling; collaborations; monitor sales, reorders, and feedback to inform future design/production. |